
Testing solar panels is an important step in making the switch to clean energy. You want to make sure that the panels are functioning as they should before installing them. You’ll also want to periodically test them as part of your regular maintenance.
Luckily, solar panels testing is fast and simple.
In this article, we cover the step-by-step process of solar panel testing. After discussing the tools you’ll need, we’ll teach you how to test a solar panel with a multimeter. Finally, we’ll walk you through some common problems you may encounter.
Solar Panel Tester Tips and Preparation
Before testing your solar panels, there are a couple of details you should know.
- Purchase a Multimeter
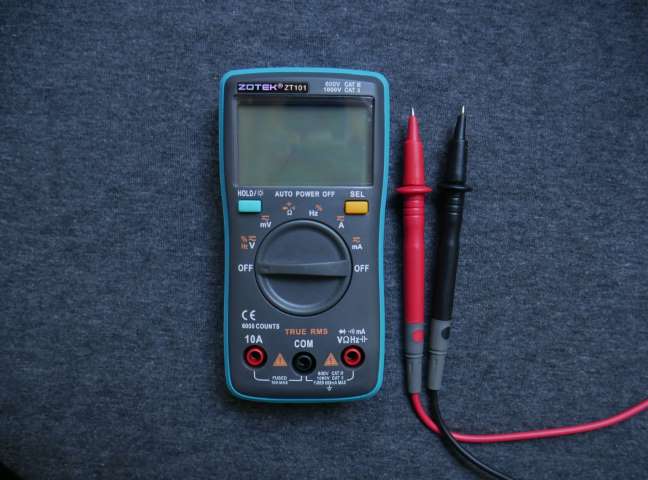
A multimeter is a device that is used to measure voltage (volts), current (amps), and resistance (ohms). We recommend using a digital multimeter, as it offers a more accurate reading than the analog variety.
- Direct Sun
When testing solar panels, make sure it’s a bright and clear day; unobstructed sunlight conditions are essential for accuracy. When you begin, position the panel in direct sunlight. Otherwise, your reading will be weak.
- Solar Charge Controller
Solar charge controllers ensure that your solar panels are performing within their intended range. They do so by preventing the current/voltage from exceeding its maximum limit. In the absence of one, you risk overcharging your batteries, leading to internal damage.
When testing your solar panels, check that the solar charge controller isn’t fully charged. If it is, it’ll resist the current from the multimeter.
| Call-out/Tip
The electricity that’s fed to your building’s electrical system is alternating current (AC). However, the photovoltaic (PV) cells in solar panels convert sunlight into direct current (DC). That’s why you need an inverter to convert DC current to AC current. |
How to Test Solar Panel Output
1. Clean Solar Panel
Before testing a solar panel, remove any dust or debris from its surface. Not doing so will result in a weak reading. Use a clean, dry microfiber cloth.
2. Check Voltage/Current Rating
Before testing your solar panel, you’ll need to know its rating. To find this information, flip the panel over. You’ll see a sticker containing several metrics. Pay special attention to the open-circuit voltage (Voc) and the solar panel amperage (Imp).
-
Voc
A panel’s Voc is its measure of electrical potential in direct sunlight. It can be checked using a voltmeter.
-
Imp
The Imp represents the panel’s maximum current when in direct sunlight. You can measure it using an amp meter.
3. Open Converter Box
The converter box is on the rear of the solar panel. Remove the cover to expose the wiring.
4. Set Multimeter to Volts
Configure your multimeter so that the positive lead is attached to the volt port (usually denoted as VΩmA or mAVΩ). Remember, the positive lead is the red one.
Now, set the multimeter to a voltage greater than your panel’s Voc rating; this will produce the most accurate reading.
Finally, check that the multimeter is set to DC voltage—not AC. DC is generally denoted by a V with two parallel lines above it: one dotted, one solid. AC is depicted as a V with a squiggly line on top.
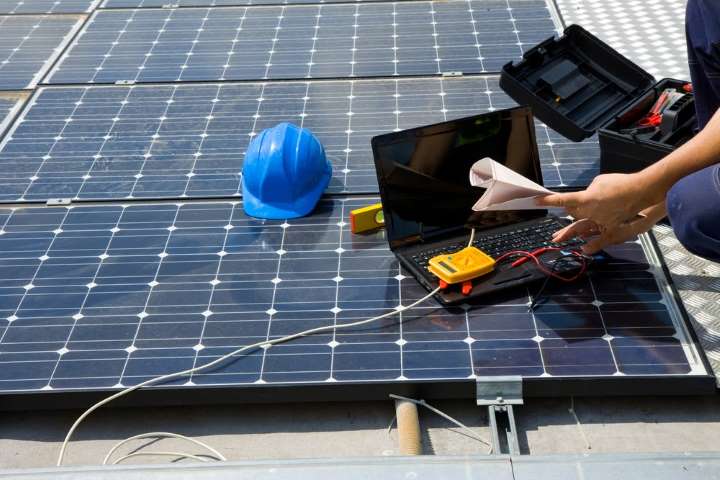
5. Connect Multimeter to Solar Panel
Attach the multimeter to the solar panel. The positive lead (or red wire) should be connected to the panel’s positive terminal. Likewise, the negative lead (or black wire) must be connected to the panel’s negative terminal.
The panel’s voltage will appear on the multimeter’s screen. Remember to turn off the multimeter before disconnecting the leads.
6. Set Multimeter to Amps
Transfer the positive lead from the volt port to the amps port, usually depicted with a capital A. Like with voltage, set the current to any amount greater than the panel’s Imp rating.
7. Reconnect Multimeter to Solar Panel
Repeat step 5.
8. Calculate Solar Panel Output
Hopefully, your solar panels have passed their tests with flying photons! To finish up, calculate the output.
Power (Watt-hours) = Voltage (Volts) X Current (Amps)
Simply multiply the voltage (in volts) by the current (in amps) using the amounts registered on your multimeter. The result is power, measured in watt-hours.
To account for interference, take 75% of that result—this represents the practical output of your solar panel.
And that’s really all there is to it. You should also know how to test a solar panel charge controller. Check out this helpful article for tips.
| Learn more about solar panels: |
Now You Know How to Test Solar Panels – Learn to Troubleshoot Them
Testing your solar panels is just the first step in ensuring their longevity. Let’s now turn to some common issues you may encounter. If any of these sound familiar, consult a technician.
- Inverter Problems
Solar panels have an impressive lifespan of around 20 years. But don’t be surprised if your inverter only lasts 10-15 years. As mentioned above, inverters actually make solar power usable; never neglect a failing inverter.
If you encounter any problems with your inverter, check your manufacturer’s warranty before attempting to resolve the issue yourself—doing so could result in a voided warranty.
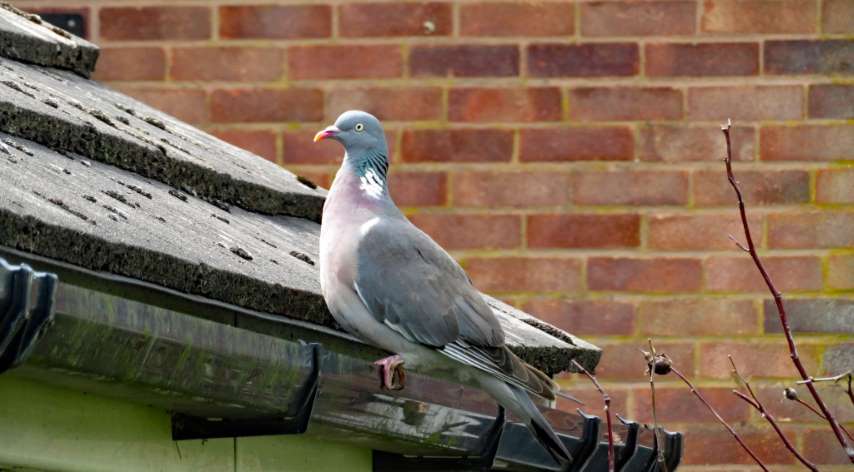
- Birds
If there’s space between your panels and your roof, birds will find their way in. Some will even make a nest beneath your panels.
Birds can scratch the panel glass or damage exposed wiring. Ideally, your solar panels are roof-integrated. If not, you can install bird mesh, roof spikes, and yes—even plastic predators.
- Hot Spots
Hot spots are both dangerous and destructive—luckily, they’re also fairly rare. In one study, 3,000 panels were analyzed for hot spots. Of those,1.5% showed hot spots with an increased operating temperature of between 10ºC and 20ºC. An additional 2.5% of the panels had hotspots greater than 20ºC.
Hot spots can be avoided by selecting good quality panels and keeping them unobstructed. For instance, avoid panels with poorly soldered joints and instead opt for ones with built-in drainage corners. A buildup of debris can also cause hot spots.
- Bad Wiring
Unless you’re a trained electrician, it’s best not to play with the wiring in your panels. That said, it’s important to make a visual inspection. Look for things like loose connections, corrosion, or oxidation—all of which can obstruct your panel’s ability to produce electricity.
- Cracks
Occasionally, solar panels sustain damage during transportation. That’s why it’s important to check your new solar panels for cracks upon arrival.
Extreme weather and falling debris can also create hairline cracks in your panels. Inspect them regularly, as a barely visible fissure can quickly grow in size.
You Don’t Need to Worry About Solar Panel Testing…When You Work With Airis
Congratulations on recognizing the power of solar energy. Now that you understand how to test a solar panel, we encourage you to put it into practice. Always test new panels before installation. For maintenance purposes, every five years—or in the wake of an extreme weather event—will suffice.
Thinking of buying or installing solar panels? There’s no substitute for Airis Energy. We offer efficient lighting solutions to both commercial and residential clients.